
1 May 2025
This is the original rear kitchen layout the van had when we bought it. As you can see, when the tailgate is open, you can access most compartments — but the hob and sink have glass covers that open inwards, meaning they’re only usable from inside. Also, the worktop is far too high to use comfortably from outside.

I removed the kitchen unit and flooring to give myself a blank canvas to begin the conversion.

The previous setup had the passenger bench seat mounted rear-facing, and the seat rails had been cut. Luckily, a member of the Mazda Bongo Facebook group had a set of original full-length seat rails and sent them to me — they arrived within a few days. I cleaned off the rust, applied wax spray for protection, and reinstalled them.
Now we have a sliding passenger seat that can move from the back to the front of the van, and a solid rail system to build on.

I’m designing the smallest possible functional kitchen using the 15 mm lightweight caravan plywood reclaimed from the original unit. This photo shows one of my early mock-ups.
Here’s what I’m aiming for:
- The kitchen will be 40 cm deep and sit directly behind the driver’s seat.
- It will be secured to the seat rails using hand-tightened T-bolts, allowing easy removal — great for outdoor cooking or transporting large items.
- It will have 10-litre clean and grey water tanks.
- It will include a sink and tap.
- There will be space for a gas cartridge camping stove.
- The hob can also be used indoors on a table when needed.
- A fridge will be included.

For the sink, I decided to use a stainless steel 1/2 Gastronorm tray, 100 mm deep. These are common in commercial kitchens — cheap, sturdy, and easy to find. Only £10! Here’s the link: https://amzn.eu/d/2ja2MXG
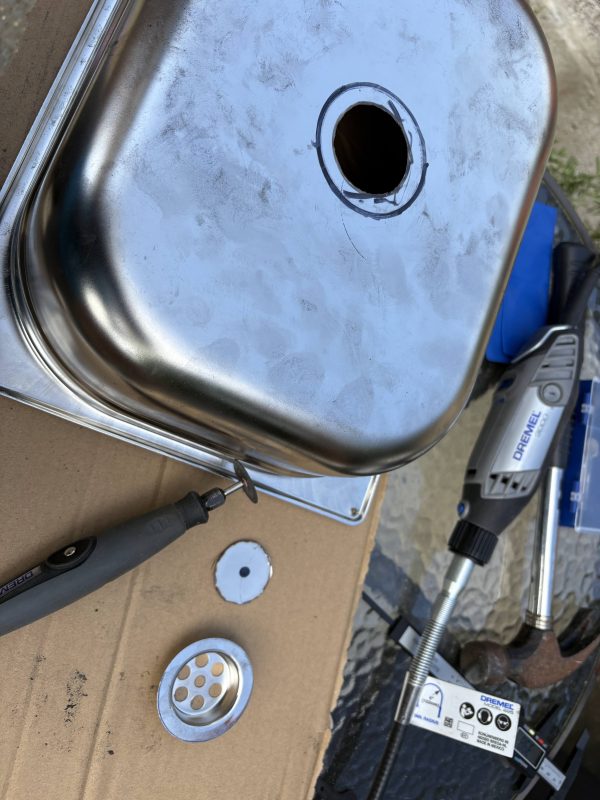
Cutting and drilling stainless steel can be a pain — most standard bits overheat quickly, and hole saws for sinks are pricey. I tried using a Dremel by hand and, to my surprise, the cutting disc sliced through the steel like butter. It only took about three minutes to finish the cut.

I installed the sink drain and sealed it in with silicone.

If you’ve ever installed a stainless sink, you might wonder what these strips are. The answer’s simple: they’re vibration dampening pads. They’re standard on many sinks to stop the metal ringing like a bell every time water hits it. I quickly realised I needed the same — the sink was making loads of noise with even small splashes.
I ended up sticking a roofing repair tape underneath. It’s heavy, super sticky, and does the trick. Any dense tape or bitumen mat should do the job.
The sink is now ready! See you in Part 2 of the kitchen build.