Clothesline for Mazda Bongo :)

Well, this was definitely the funniest invention of mine this week!

Last week while camping, I tested the first version of my 3D-printed clothesline (above). It worked — but was far too bendy and flexible to be practical.

So, I came up with a much simpler and stronger design.

The new design is a single rigid part. Two clotheslines stretch between the arms, and tensioning them is super easy — as shown in the video above. It clips on and off the gutter in seconds.

If you’d like to grab one, just search for Bongo Clothesline on eBay UK. 😊

Mazda Bongo Awning Brackets

2 August 2025

I spotted a 2-metre Vevor awning on AliExpress (UK warehouse) and it was delivered in just three days — too good to miss!

However, when I started looking for mounting brackets, I only found ones that cost more than the awning itself and were designed to sit directly against the door pillars. The awning’s rail is 195 cm long, so if mounted directly, part of it would end up above the rear window — not ideal.

So, I designed my own bracket system that attaches directly to the rain gutter and distributes the weight evenly across three 5 cm wide printed parts.

I went through over ten iterations, testing different shapes and materials. My first choice was carbon fibre-reinforced nylon — it’s strong and rigid, but too harsh on the van’s painted surface. Worse, it’s brittle under impact — not ideal for supporting a roof-mounted awning.

Eventually, I settled on PETG, which offers excellent outdoor durability and flexes slightly under pressure rather than cracking. Much more suitable for this application.

The brackets grip the Bongo’s rain gutter securely and sit flush against the side. Thanks to their flat rear surface, they don’t interfere with aftermarket pop-top roof seals, allowing the roof to close normally.

Since the bracket only drops about 10 mm below the gutter line, it doesn’t obstruct the sliding door or the front passenger door. You can mount the awning anywhere along the vehicle.

We tested the setup on a 600-mile, 5-day trip — including strong wind and heavy rain — with zero issues. Everything held up perfectly.

If you’d like to order a set, you can get them from our eBay page:
https://www.ebay.co.uk/itm/376458862705

Mazda Bongo Bed Conversation

14 May 2025

I built a 60 cm deep bed extension frame to complete the sleeping platform when the seat is folded flat. I reused the front panel from the original kitchen unit, which was left over from the previous conversion. This gives it a neat look — and more importantly, allows access to storage under the bed via the cabinet doors if needed.

The frame is secured to the seat rails using T-bolts, so it can be removed easily when required. It’s very lightweight and practical. There’s enough space underneath to store two under-bed containers and a folding table.


I also designed and 3D-printed some elastic mountings to safely transport the Porta Potti 345 toilet in the van. They hold it firmly in place — and although it’s a tight fit, it can even be used inside the van when absolutely necessary.

Meet Totoro – Our Bongo Is Road Ready!

Great news — our Bongo has just passed its MOT!

That means we can now insure it and finally start using it properly. After some thought, we’ve decided on a name: Totoro.

Just like the beloved character from Studio Ghibli, our van is grey, comes from Japan, and will be taking us on all kinds of little (and maybe big) adventures.

Here’s to many miles of memories with Totoro! 🚐✨

Evdeki eski stencil router ile bu stickerlari tasarlayip kestim.

Underseat Drawer – Possibly the Best Mod I’ve Done

10 May 2025

Thanks to the Vantastic Ideas YouTube channel, I was inspired to build this underseat drawer for our Bongo — and after a few trips, I can confidently say it’s the most useful and practical mod I’ve done so far.
Here is the Vantastic Ideas youtube channel
https://www.youtube.com/watch?v=Qy871J2cICg

I removed the factory underseat plastic trim and installed a pair of 350 mm heavy-duty drawer runners directly into the trim screw mounting points, using longer screws. They lined up perfectly and fit snugly.
Runner link (UK): https://amzn.eu/d/h4M8AVP

The runners are strong enough to support a fully loaded drawer even when fully extended — really impressed with their performance so far.

I made the drawer using leftover panels from the kitchen conversion and a 4 mm plywood sheet from B&Q. It came together nicely and feels very sturdy.

The narrow middle section is intentional — it leaves clearance for the seat release handle. That way, plates and gear can’t block it or dislodge the seat from the rails in case of sudden movement. We only keep low-profile, soft items in that middle area.

Finally, I covered the drawer front with 4D stretch carpet to match the van interior. We now keep nearly all kitchen essentials in this drawer — and the kids can grab snacks like crisps by themselves during travel. Super handy!

Note: A locking mechanism is essential. I designed and 3D-printed a small latch that attaches to the seat release handle. When the handle lifts about 1 cm, the drawer is released. Simple and effective.

Switching Mazda Bongo Interior Systems to the Leisure Battery

I wanted the Mazda Bongo’s electric curtains, interior lights, and similar accessories to run from the leisure battery instead of the starter battery. Rather than rewiring everything, I made a simple but effective modification at the fuse box.

Important: When doing any internal wiring in your vehicle, always include a fuse as close as possible to the battery output. This helps protect against cable damage or short circuits if the wire gets pinched or worn.

I installed a 20A fuse at the leisure battery output and ran a cable from there to the fuse box. At the fuse box, I soldered the ends of two cut fuse taps (fuse connector blades) to this cable and inserted them into the bottom legs of the relevant fuse slots. That way, the electric curtains, interior lights, and the cigarette lighter socket are now powered by the leisure battery instead of the main one.

Update: The car stereo was also powered through the cigarette lighter socket. However, I discovered that the aftermarket audio system I installed draws too much current, even when idle. So I reverted the cigarette socket to the starter battery by reinserting the original fuse.

Above: 2002 Mazda Bongo 2.0L standard fuse box layout for reference.

Kitchen Conversation – Part 2

3 May 2025

As I mentioned in Kitchen Conversion – Part 1, I realised how valuable the lightweight caravan-grade plywood panels from the original kitchen were. They’re not sold in small sizes — a standard sheet is 2440 x 1220 mm, and shipping can add another £100 or so due to the size. So I decided to reuse every possible piece from the old kitchen.

The cabinet door from the previous kitchen is now repurposed as the new kitchen top. I used a router to cut the sink opening.

I quickly built a cabinet — 32 cm wide, 40 cm deep, with two shelves — in about 30 minutes. I reused brackets and screws salvaged from the old kitchen.

This 3D-printed piece I designed holds the tap in place. It also allows me to remove the electric tap easily when it needs recharging.

Here’s the interior: there’s space under the sink for the stove, and at the bottom, two 10-litre water tanks for fresh and grey water.

I decided to add a fold-out table made from a second panel. When folded, it sits in front of the cabinet and acts as a door, covering the shelves. I designed this 3D-printed bracket to attach the folding table hinges to the cabinet frame.

This is how the hinge bracket attaches to the cabinet.

And here’s the table when extended.

This is the rear of the cabinet. The water hoses will enter the tanks from here.

And that’s the final result! The cabinet is now fully functional and in use, just as you see in the video. I drilled two holes in the bottom shelf to attach it to the seat rails using T-bolts. That means it can be removed in 2–3 minutes for outdoor use or to create more cargo space inside the van.

Lastly, here’s a quick word about our fridge.
BINGI 18L – I highly recommend this compact top-opening fridge for any campervan where space and energy efficiency matter. It’s affordable, uses space efficiently, and can even fit a wine bottle standing up 🙂

Its compressor is impressively efficient. On a hot summer day when the van interior reached 35°C, it consumed an average of 220Wh per day. In full use by four people, it peaked at 260Wh daily. With a pair of 135W solar panels in series, the Victron charger fully replenishes overnight consumption by around 8 AM the next morning, switching to float mode.

Here’s the link: https://amzn.eu/d/5hy23V5

Update – 2 August 2025:
Still working flawlessly, and we’re genuinely happy with it. Especially helpful after supermarket trips — you can keep food chilled, or even switch to -18°C deep-freeze mode when needed. Strongly recommended.

Kitchen Conversation – Part 1

1 May 2025

This is the original rear kitchen layout the van had when we bought it. As you can see, when the tailgate is open, you can access most compartments — but the hob and sink have glass covers that open inwards, meaning they’re only usable from inside. Also, the worktop is far too high to use comfortably from outside.

I removed the kitchen unit and flooring to give myself a blank canvas to begin the conversion.

The previous setup had the passenger bench seat mounted rear-facing, and the seat rails had been cut. Luckily, a member of the Mazda Bongo Facebook group had a set of original full-length seat rails and sent them to me — they arrived within a few days. I cleaned off the rust, applied wax spray for protection, and reinstalled them.

Now we have a sliding passenger seat that can move from the back to the front of the van, and a solid rail system to build on.

I’m designing the smallest possible functional kitchen using the 15 mm lightweight caravan plywood reclaimed from the original unit. This photo shows one of my early mock-ups.

Here’s what I’m aiming for:

  • The kitchen will be 40 cm deep and sit directly behind the driver’s seat.
  • It will be secured to the seat rails using hand-tightened T-bolts, allowing easy removal — great for outdoor cooking or transporting large items.
  • It will have 10-litre clean and grey water tanks.
  • It will include a sink and tap.
  • There will be space for a gas cartridge camping stove.
  • The hob can also be used indoors on a table when needed.
  • A fridge will be included.

For the sink, I decided to use a stainless steel 1/2 Gastronorm tray, 100 mm deep. These are common in commercial kitchens — cheap, sturdy, and easy to find. Only £10! Here’s the link: https://amzn.eu/d/2ja2MXG

Cutting and drilling stainless steel can be a pain — most standard bits overheat quickly, and hole saws for sinks are pricey. I tried using a Dremel by hand and, to my surprise, the cutting disc sliced through the steel like butter. It only took about three minutes to finish the cut.

I installed the sink drain and sealed it in with silicone.

If you’ve ever installed a stainless sink, you might wonder what these strips are. The answer’s simple: they’re vibration dampening pads. They’re standard on many sinks to stop the metal ringing like a bell every time water hits it. I quickly realised I needed the same — the sink was making loads of noise with even small splashes.

I ended up sticking a roofing repair tape underneath. It’s heavy, super sticky, and does the trick. Any dense tape or bitumen mat should do the job.

The sink is now ready! See you in Part 2 of the kitchen build.

Fibreglass Roof Repair

3 April 2025

The weather in Canterbury looked promising this week, so I took the plunge and removed the roof to begin repairs. A good friend of mine had already helped straighten the bent stainless steel roof scissor mechanism.

For the repairs, I used a 2-litre fibreglass repair kit — it came with fibreglass fabric, polyester resin, and the required hardener.

I started by grinding away the shredded 30×30 cm section at the edge of the fibreglass roof using an angle grinder. Of course, this opened up even more gaps in the damaged areas. I covered the underside of the holes with masking tape and added some timber support blocks to hold the fibreglass layers in place as they cured.

The final state before repairs began.

There were seven cracked areas in total on the roof, which I patched using 4–5 layers of fibreglass each. Since each layer takes around 20 minutes to cure, I worked in a clockwise pattern around the roof — mixing small batches of resin and patching one crack at a time. This method meant I wasn’t sitting around waiting; instead, I was always working on the next area. The job was done in a single day.

Before painting, I sanded the entire repaired surface to prepare it properly.

I finished with a coat of matte black automotive paint. It’s far from perfect, but for a DIY job, I think it’s acceptable. I’ll share a mistake I made at this stage: I didn’t properly sand and degrease the areas that weren’t damaged. Because of that, some of the paint on the previously intact surfaces started peeling off a few days later.

Lesson learned — always prepare every surface with the same care before painting.

And here’s the result!
We finally have a fully sealed and sturdy pop-top roof again.

First Rust Repairs on Our Bongo

28 February 2025

The weather finally improved enough for us to start working on our Bongo. In the meantime, I did plenty of research and gathered all the materials we might need.
First task: repair the small rust patches before they get any worse over time.

This was the largest visible paint bubble on the van — around 8–10 cm. I thought it would be a quick fix, so I started scraping the paint… and then…

It turned out the problem wasn’t as small as I had hoped 🙂
Even tiny 1–2 mm bubbles turned into 3–4 cm holes once I scraped the paint away.

First, I reinforced the holes with aluminium mesh. This acts as a base for the filler, which is a mix of polyester resin and fibreglass strands.

Once the coarse filler dried, I sanded it and applied a finer layer.

This is what it looked like after sanding — ready for paint. I know it’s not a perfect finish, but this is my first time trying something like this. I expect I’ll have to do it again at some point, so I’m deliberately avoiding wasting time chasing flawless results.
As someone once said (I wish I remembered who):
“Give me your third-best — the second-best takes too long, and perfection takes forever.”

To avoid creating harsh edges when spraying paint and lacquer, I used a trick I saw on YouTube. Curling the edge of the masking paper gives a much softer transition for the spray.

I used spray bottles matched to the van’s original paint code, followed by clear coat.
The result is shown above. Unfortunately, even though the colour code matches, the metallic particles in spray paint don’t align the same way they do in the factory — which a friend warned me about. For a proper metallic finish, you really need to paint the entire panel, which is beyond my skill level (and not possible with rattle cans).
That said, the mismatch is barely noticeable unless you’re in direct sunlight.

Our First Mazda Bongo — A Rough Start

21 January 2025 – Canterbury, UK

we just bought our Mazda Bongo

We bought our very first Mazda Bongo today!

It’s a 2002 model with 171,000 km on the clock. Unfortunately, it came with a significant history: the previous owner tried to drive it out of a height-restricted car park with the fibreglass pop-top open. As a result, the third-party roof was badly damaged — a 30×30 cm piece is completely missing from one corner, the metal scissor mechanism is bent, and there are structural cracks in at least seven different places, some of them spanning the full width of the roof.

Surprisingly, the awning survived intact. The mosquito nets, however, are torn in several places, though nothing too serious.

The engine struggles to maintain idle due to a faulty MAF (Mass Air Flow) sensor, but overall, the van is in remarkably clean condition. There’s barely any rust on the engine or chassis, and only two visible patches of bubbling paint around the wheel arches.

The Rear Kitchen Layout – Not Quite Right for Us

After being imported into the UK, the van was converted with a rear kitchen layout and a pop-top roof. Inside, there are bench seats built over the rear wheel arches and a rear-facing passenger bench just behind the front seats. The setup feels more like a travelling café than a campervan. With two children, we quickly realised that it’s not suitable for our family. There’s barely any storage space left, and the kids have to travel backwards.

Reading forum posts confirmed our experience: large kitchens and fixed seating arrangements in such compact vehicles often turn out to be impractical during hot summer days. Many owners report never actually using their built-in hobs. Moving the hob outside and repurposing the interior kitchen space for storage seems to be a smarter choice — and that’s what we’re planning to do.

inside of Bongo

A Bargain Buy?

We paid just £2,000 for the van, with only 20 days remaining on its MOT. So while it needs a fair bit of work, it’s a solid base — and we’re excited to start making it our own.

Filo Yufkasından Burma Baklava Yapımı

İngiltere’de özlediğim şeylerden biri de baklava.

Normalde çok aramam ama emin olun Türk olduğunuz duyan herkes size baklavayı hatırlatıp öve öve bitiremeyecek. Haliyle insanın canı çekiyor.

Geçen gün Sainsbury’s markette soğuk gıda reyonunda filo yufkası diye birşey buldum, çok ince oldukları belli, bana baklava yufkası gibi geldi ve alıp denemeye karar verdim. Sonuç o kadar iyi oldu ki ömrümde yediğim en iyi ilk 10 baklava arasına rahatlıkla girer. Öyle yurtdışında idareten falan değil, gerçekten nefis bir burma baklava oldu.
O yüzden tarifi kaybetmemek için buraya koymaya karar verdim.

Malzemeler :

  • 11-12 yaprak filo yufkası. (Türkiyede baklava yufkası diye satılıyor)
  • 170 gr tereyağı
  • Dövülmüş ceviz

Şerbeti İçin:

  • 2 su bardağı su
  • 2 su bardağı toz şeker
  • Çeyrek limon suyu

Hazırlanışı :

  • Şerbet malzemesini tencereye koyup orta ateşte hafif sarı renk alana kadar kaynatıyoruz.
  • Rengi gelen şurubun altını kapatıp soğumaya bırakıyoruz.
  • Filo yufkasını masaya açıp ucundan 4cm(2 parmak) içe katlıyoruz,
  • Erittiğimiz tereyağını fırça ile sürerek iyice yağlıyoruz,
  • Kalan kısma ceviz serpiyoruz.
  • Oklavayı katlı kısma koyup yufkayı oklavaya sarıyoruz. çok sıkı olmamalı.
  • yufkaya sarılı cevizli yufkayı iki ucundan ortaya bastırıp büzülmesini sağlıyoruz.
  • Oklavayı çekip çıkarınca baklavalarımız hazır hale geliyor, bunları tepsiye sıkışık şekilde diziyoruz.
  • Kalan tereyağını da fırça ile üstüne sürüyoruz.

IMG_0525-0.jpg

  • Tepsimizi 180 dereceye ısıttığımız fırına koyup kızarana kadar pişiriyoruz. Benim tepside 25-30 dakika kadar sürdü.

IMG_0526-0.jpg

IMG_0527-0.jpg

  • Fırından çıkardığımız baklavaları, 5 dakika kadar soğumaya bırakıp sonra şerbeti heryerine gelecek şekilde döküyoruz.

IMG_0528-0.jpg

Afiyet olsun

Kıymalı Pide Tarifi


IMG_4382


Bu pideyi yaptıktan sonra o kadar beğendik ki, tarifi unutmamak için buraya yazıyorum. Şiddetle tavsiye ederim.

Malzemeler:

  • 300gr Kıyma
  • 1 yumurta sarısı (beyazını kıymalı içe de katabilirsiniz)
  • 2 Orta boy soğan veya 1 büyük boy.
  • 1 çorba kaşığı kuru maya
  • 400gr Tambuğday unu (Ben kepekli un ve self-rising beyaz unu yarı yarıya karıştırıp kullandım)
  • bir büyük domates
  • Maydanoz
  • Karabiber
  • Kekik
  • 1 tatlı kaşığı şeker
  • 1 yemek kaşığı tuz
  • Ilık su

Yapılışı

  1. Bir bardağa kuru maya ve şekeri koyup yarısına kadar ılık su ile doldurup karıştırın
  2. Maya çoğalıp köpürene, bardağı doldurana kadar bekleyin
  3. Büyükçe bir kaba unu koyup ortasına mayayı dökün, yarım bardak daha ılık su koyup tuzu da ekleyip yoğurun.
  4. Cıvık olursa un ekleyip kulak memesi kıvamına getirin.
  5. Hamuru top şekline getirip bir kaşık zeytinyağı ile hamur topunun dışını yağlayın.
  6. Üstünü streç film ile kaplayıp 1 saat mayalanmaya bırakın.
  7. İçi için, bir kapta çiğ kıyma, ince kıyılmış domates, soğan, maydanoz, kekik ve karabiberi karıştırın.
  8. Kıymaya kolay açmak için bir miktar su katın.
  9. Hamuru büyük boy mandalina kadar parçalara bölüp açın, içini koyup, kenarlarını kıvırın.
  10. Yumurta sarısını(isterseniz bir kaşık yoğurtla karıştırıp) kenarlarına sürüp 180-200 derecelik fırında 10 dakika kadar pişirin.


IMG_4374

IMG_4386IMG_4375 IMG_4377 IMG_4378


Paskalya Kekleri / Easter Cakes

poshCornCake02

İngiltere deneyimlerimi yazmayı ne zamandır düşünüyordum ama ilk senemiz olduğu için gerçekten çok çalışıyorum bu tür blog aktivitelerine zaman ayırmam zor. Ama bir ucundan başlamam lazım bu sakin pazar sabahında geyik bir konu ile giriş yapayım.

Yarın Easter Day(paskalya günü), yani İsa peygamberin öldükten sonra dirildiği gün.  Bana sorarsanız kutlanma şekli ve sembollere bakılırsa daha çok pagan inancından kalma bir bahar kutlaması. Yavru kuzular, yumurtalar, kuş yuvaları gibi semboller ağırlıklı.

Dini detayını çok iyi bilmiyorum o kısma girmeyeceğim benim takıldığım konu İngiltere’de geleneksel kutlama yiyeceği olan paskalya keki. Kek dedim diye yumuşak bir şey değil burada pişmiş tatlı şeylerin yarısına kek deniyor.
Bu keki “geleneksel” bir yiyecek olarak çocuklarla yapıp tüketiyorlar ancak geleneksel olması imkansız, komik bir yiyecek.

Çünkü cornflakes ve çikolatadan yapılıyor(!)

Televizyonda huşu içinde nasıl yapıldığını anlatan birini gördüğümde gülmekten ölüyordum.
Aklımda bir an son yemek masasında 12 havari ve İsa çikolatalı cornflakes yerken canlandı. 🙂

Mutfak kültürleri gerçekten de yerlerde sürünen, yemekte anladığı patates kızartması cips ve kızarmış balık (fish&chips) olan ortalama ingiliz ailesinin  bazılarının evlerinde mutfak bile yok, bu insanların dini bayramlarında geleneksel yiyecek olarak Baklava açması veya bumbar dolması yapması mümkün olmadığından buldukları çözüm, ortak payda olarak cornflakes ile çikolatayı karıştırıp kek kağıdına koymak üzerine de çikolatadan yumurtalar koyup kuş yuvası yapmak.

Daha ciddi ve örnek almamız gereken konularda yazmaya devam edeceğim.

Şimdi güldüysek dağılalım.

Happy Easter

Peynirli/Zeytinli Poğaça

Bu tarif şu adresten alınmıştır.
Deneyip beğendiğim tarifleri kaybetmemek için bloguma aktarıyorum bu da onlardan biri.

Orjinal tarife göre yaptığımda hamur çok cıvık oldu, bunda tam buğday unu kullanmış olmamın etkisi olabilir o yüzden ben kendi yaptığım tarifi yazacağım.

Gerekli Malzemeler:

  • 4.5 su bardağı tam buğday unu
  • 2 yumurta (birinin sarısı üstüne sürmek için ayrılacak)
  • yarım çay bardağı sıvı yağ
  • bir tatlı kaşığı tuz
  • iki dolu tatlı kaşığı kabartma tozu
  • 1 su bardağı yoğurt
  • içi için peynir veya zeytin
  • üstü için çörek otu (evde yoktu kullanmadım)

Yapılışı

  • Un, tuz ve kabartma tozunu iyice karıştırıp ortasını açıyoruz.
  • 1 yumurtanın tamamı, öbür yumurtanın sarısı, sıvı yağ ve yoğurdu koyup yoğuruyoruz
  • top yapılabilecek kıvamda olması lazım eğer yapış yapış ise biraz daha un ekliyoruz.
  • ortasını açıp malzememizi koyup kapatıyor, üstüne yumurta sarısı sürüp, çörek otu serpiyoruz.
  • 180 derecelik fırında üstü kızarana kadar pişiriyoruz. Benim fırında 25 dakika kadar sürdü.

Afiyet olsun.

FLIR Lepton Thermal Camera with RaspberryPi

FLIR’s new Lepton camera is a revolution for Hobby market and DIYers.
It’s cheap (less than 200$),
Simple (SPI and I2C only),
And still enough resolution for daily applications (80×60 pixels)

I bought my flir module and breakout board from Sparkfun. Sparkfun price is overrated (~350$) but still in the range for fast shipping.

IMG_3809
So, First I tested it with an Arduino but bad news, Arduino boards not enough RAM for image data.
You need 9600 bytes space for each frame and also I2C and SPI speed is limited.

Then I tried my Raspberry Pi board.
The sample application is well designed and working flawlessly under X-window interface.
10420396_1551579568462140_739996662821623972_n

Adding some new features are relatively easy than microcontroller based solutions.

10537121_1551736135113150_8230907516994965526_n

I’m going to design an analogue thermal camera for drones with FLIR Lepton module,
So, I need small and plug and play solution.
I’m working on Raspberry Pi Compute Module in these days but then I will test an FPGA solution for Lepton.
FPGA based design works fast, no need any boot time and also really small.

Thanks for reading
Melih


434mhz Preamp + Filter

I’ve designed a prototype antenna preamp with SAW filter for my HAB tracker setup.

IMG_3482-0.JPG

The board is including a voltage regulator and supporting power over coaxial or external battery options.
Preamp gain is ~20db  and SAW filter is eliminating out of the band with a small cost(-3db).

VNA_141118_144219

The results are promising. So, We will design and manufacture SAW filtered version for HAB and non-SAW versions for FPV setups.
They will be in stocks in a few weeks on Flytron.com

DIY RTL-SDR Shielding

Hi there,

I was looking for a shielding solution for my modified RTL-SDR dongle. I came across some blog posts about RTL-SDR shielding, but most of them involved hard aluminium cases — and I don’t have the tools here to cut or drill metal enclosures. So, I found a softer alternative.

I ordered 25mm-wide pure copper tape from eBay. It’s inexpensive and surprisingly effective for RF applications. Plus, it’s solderable.

It’s sticky enough and very easy to bend and shape.

IMG_3387

I used my fingernails to press and shape the tape neatly around the edges.

IMG_3389

The entire job took less than five minutes. It now looks like a little piece of jewellery! I used four separate strips for the four sides, so I needed to electrically join them together.

IMG_3392

I used my old Metcal SP2V soldering iron — a high-powered unit, ideal for this kind of large copper surface. Here’s the final result:

IMG_3396

I tested it without any antenna attached. Wow — a clean blue screen! It’s working beautifully.

IMG_3398

Thanks for reading!

RTL-SDR Radio SMA Connector Replacement

I’ve changed my RTL-SDR radio plug with SMA female.
It is a really easy job if you have a powerful soldering iron.
The original connector has same foot print with SMA connectors, so you can easily remove the original one and solder an SMA connector there.  Also, I’ve removed the useless IR receiver.
Here is the result.

IMG_3363 IMG_3366

Domates Hakkında


Salça’yı Türk kültürünün bir parçası olduğunu sanıyorsanız üzülmeyin,

Sizi de benim gibi, “komşu ülkeler düşman, dünya tü kaka , bu vatan cennet” diye yetiştirmişlerdir.

Osmanlı’ya 1800 lerin sonunda gelen domates’in hiç bir gerçek Türk yemeğinde olmadığını da,
Salça’nın İtalyan icadı olduğunu da,
Domates’in Güney Amerikadan 1521 yılında İspanyolarca getirildiğini de bilmeyiz.

tomatoessd71

Ha bildiniz ne oldu?
Bilmem akşam akşam aklıma geldi. 🙂

Not: Hadi bu da size kıyağım olsun birisi önünüze “Osmanlı mutfağından” falan diye salçalı domatesli yemek korsa, kapak edersiniz.

SDR Radio – Yazılım Temelli Radyo Nedir?

Yüksek irtifa balonculuğuna uzun zamandır meraklıyım ve yıllardır ufak tefek balonlar bırakarak denemeler yapıyorum.
Yurtdışına taşınmam ile beraber bu denemelere bazı sınırlamalar geldi, özellikle bulunduğum ülkede(UK)  frekans regülasyonalrı başarılı biçimde uygulandığı için kurallara uymak kaydı ile çok uzak mesafelerden veri aktarımı yapmak mümkün. Uluslararası en büyük yüksek irtifa balonculuğu(HAB) organizasyonu UKHAS‘ın da burada olması sebebi ile konuya biraz daha eğilmeye karar verdim.

Balonculukta en önemli konulardan biri balonun takibi ve SDR da amatör radyoculuğun yeni ve eğlenceli alanı olduğu için öncelikle bu konuda birtakım bilgiler vermek şart.

SDR Nedir?

Basitçe SDR, normalde bilgisayar TV tunerı olarak üretilmiş çiplerin veya hazır USB kartların, yüksek hızda kanal değiştirebilme ve frekans tarayabilme özelliklerini kulanarak son derece gelişmiş bir alıcıya ucuz bir şekilde sahip olmaktır.
Yani SDR radyolar genellikle Bir frekanstakis inyal seviyesini ölçebilen ve bunu çok hızlı yaptığı için geniş bir bandı görmemizi sağlayan aletlerdir. Fiyatları da 5$ ile 5000$ arasında değişir.
5$ lık olan SDR lar, Ebay da bulabileceğiniz çin malı usb TV kartlarıdır ve  hassasiyetleri çok fazla olmayıp parazit oranları yüksek olsa da hobicilerin %95’inin işini görür. Bu en ucuz SDR cihazlar RTL2832U + R820T çipsetlidir.

$_12
Ebayde satılan klasik bir R820T DSR radyo.Fiyatı kargo dahil 9$

SDR ile neler yapılabilir?

  • Öncelikle en eğlenceli kısmı burası, Polis, İtfaiye, Çöp toplama araçları, Zabıta, Hava trafik kontrolleri, FM radyolar, TV lerin ses bantları gibi 20-1300Mhz aralığındaki sesli yayınların hepsini dinleyebilirsiniz. Üstelik SDR aynı anda tüm bandı görebildiği için birden fazla kanalı canlı olarka takip edebilmeniz de mümkün. Sanıldığının aksine Polisi ve bu yayınları dinlemek yasak değildir, suç da değildir. Havada yayınlanan ve vücudunuzdan geçip giden radyo dalgalarını alıp kaydetmek tamamen serbesttir. Ancak Türkiye’de yasalar ile belirlenmiş aralık dışında yayın yapan verici cihazlar yasal değildir. UK de ise cihazlar serbesttir ancak bu cihazların verici modunda kullanılıp yayın yapılması yasaktır. Yani alıcı cihazlar ile ilgili hiç bir problem yoktur. Özellikle kullandığımız cihaz aslında bir TV alıcısı olduğu için bizim açımızdan hiçbir problem yok. Gönül rahatlığı ile dinleyebilirsiniz. Burada frekansları vs vermeyeceğim bunları paylaşmak her zaman doğru değil.
  • Yapacağınız yönlendirilmiş hassas antenler ile Uluslararası Uzay istasyonu iletişim verisi dahil pek çok bilimsel veriyi alabilirsiniz. Astronotların konuşmalarını dinleyebilirsiniz.
    https://www.youtube.com/watch?v=4f2QdLWswnc
  • Meteoroloji uydularından anlık görüntü araklayabilirsiniz
  • Her gün atmosfere salınan yüzlerce havadurumu tahmin balonunun(radiosonde) verilerini alabilirsiniz
  • Ve tabi ki asıl konumuz olan kendi bıraktığınız balonları takip edebilir, dünyanın her tarafındaki SDR kullanıcıları sayesinde balonunuz başka ülkelere gitse bile anlık veriyi alabilirsiniz.

SDR yazılımları

En çok kullanılan SDR yazılımı SDR Sharp dır.
sdrsharp-min
Öncelikle SDR radyonuzun windows sürücüsünü, hackleyerek işe başlamanız gerekiyor, Bu konuda ayzılmış pek çok makale olduğu için o konuya girmiyorum, google da SDR Sharp kurulumunu aratırsanız hem Türkçe hem İngilizce pek çok döküman ve video mevcut.
Daha sonra cihazı bilgisayarımıza bağlayıp SDR Sharp2ı çalıştırıp cihazı seçiyor ve sinyal hassasiyetini de aynı ekrandan maksimuma getiriyoruz.

09 sensitivity settings

yanında gelen dandik anteni ile yakın mesafe vericileri de olsa pek çok eğlenceli şey yapabiliriz. Öncelikle programın üst kısmındaki frekans seçeneğini bildiğiniz bir FM radyo kanalına getirip, sol menüden WFM i seçerseniz bu radyo kanalını dinlemeye başlarsınız, bu yeni başlayanalr için iyi bir başlangıç noktası. Daha sonra yavaş yavaş ayarlar ile oynayıp etkilerini sözlemleyin. Hazır anteninden fazla birşey beklememek yerinde olur ancak bilk başlarda yeterince eğlenceli olacağını söylemeliyim. Daha sonra konuya hakim oldukça amaca özel antenler yapabilir ve çok daha temiz ve uzun menzilli dinleme yapabilirsiniz.


Diğer bir SDR yazılımı da HDSDR
hdsdr_rtl
Kullnımı kolay olsa ve havalı görünse de bazı konularda  kafa karıştırıı ve yetersiz kalıyor bu yüzden pek tavsiye etmiyorum. Ama indirip deneyebilirsiniz.

EK yazılımlar

Yukarıda bahsettiğim SDR yazılımları bilgisayarınızdan duyulabilir sinyal çıkışı veriyor. Bu çıkan sesler eğer audio dinleme yapıyorsanız sizin için yeterli ama başta bahsettiğimiz gibi biz bunu balon takip etmek veya meteoroloji balon ve uydularından data almak için kullanacağız. Bu cihazlar ses sinyali şeklinde veri göndermek için tasarlandıkları için temelde FSK yöntemine dayanan kulağa eski modemelrin sesi gibi gelen bir melodi üretirler.  Bu melodiyi çözmek için de pek çok yazılım mevcut. Bu yazılımların hemen hepsi ücretsiz ve açık kaynak kodludur.
Yukarıda paylaştığım videoların açıklama kısımlarında ve videolarda uydu verisini okumak veya balon datasını alamk için kullanılan yazılımlar bunlardır.
Tek bir yazılımdan bahsetmediğim için özet geçeceğim, yazılımı yükleyip bilgisayarınızın ses kartını gösteriyorsunuz, gerisi iç ayarlara kalıyor. Burada ana olay, Sharp SDR ile temiz bir yayın almak, bunu temiz bir şekilde duyabilmek ve aynı anda bu ek yazılımları çalıştırıp duyduğunuz sesin içerdiği veriyi çözmek.
Bu yazılımların en popüleri FLDIGI, linkten hakkında detaylı bilgi almak mümkün.
Screenshot from 2013-07-06 11-13-07

Şimdilik bu kadar umarım SDR ilginizi çekmiştir. Devamında anten yapımı, balon vericisi yapımı ve benzeri konularda da birşeyler paylaşacağım.

Evde Pastırma Yapımı

İngiltereye taşınmamın ardından beni sucuk ve pastırma yapma merakı sardı. Malum adaya et ve süt ürünleri getirmek yasak ve yasakları hep çekici bulmuşumdur.

Öncelikle internetteki 100 kadar tarifi bir hafta boyunca okuyup karşılaştırarak başladım. Basitçe çıkardığım sonuçlar şöyle,

  1. “Üstüne çok ağırlık koyun, en az şu kadar kilo olsun” yazanlar hikaye. Endüstriyel üretim yapanlar eti asla ezip tabak gibi yapmıyor, hatta pek çok endÖüstriyel tarifte üstüne ağırlık koyma kısmı yok, amaç eti ezmek yassılaştırmak değil antrikot zaten yassı, madalyon bölgesinden(kontrfile) yaparsanız da yuvarlağa yakın olan pastırma oluyor.
  2. Etin suyunu salmasının sebebi basınç değil tuz. Bu yüzden özellikle ince sofralık tuzdan kaçınılmayacak 1 kilo ete 1 kilo gibi kullanmak en pratiği.
  3. Çemen tariflerinde un olmayan tariflerden kaçının. Çemen sadece biber, sarımsak ve çemen otundna ibaret değil. Gerçek tariflerde %80 e yakını Mısır ve Arpa unu karışımı. Un hem çemene yapışkanlık veriyor hem de suyun atılmasını ve çemenin formunu korumasını sağlıyor.

Gelelim tarife. Yaptığım pastırmayı her aşamasında fotoğrafladım ve detaylı olarka işlemleri not aldım. Bu yüzden ortalıktaki tarifler içind en derli toplusu sanırım bu olacak.

ETİN HAZIRLANMASI:

Süpermarkette fırına sürmek için hazır olarak satılan 920gr sırt bölgesi eti aldım. Türkiyede kasaba söyleyip Antrikot veya Kontrfile bütün alırsanız daha iyi olur, benim böyle bir imkanım yoktu.

IMG_2123

Etin üzerinde ne kadar yağ varsa temizlemek gerekiyor, ben başlangıçta hata edip ilk 3 gün yağla beraber bıraktım ancak yağ suyun çıkmasını ve etin kurumasını engelliyor bu yüzden iyice temizlemekte fayda var.

Temizledikten sonra ince uçlu keskin bir bıçakla etin üzerine kaslara çapraz şekilde 1-2 parmak aralıklarla derin ve kısa kesikler atıyoruz. Bu kesikler hem suyun çıkmasını hem de tuzun içeri işlemesini kolaylaştırıyor.

TUZDA BEKLETME

Bir kap içerisine tuzu boca ediyor üstüne etimizi koyup sonra her tarafını tuzla kaplıyoruz, ne kadar tuz o kadar iyi.
İlk başta yaptığım bir hata da kayatuzu kullanmaktı, bu tuz yavaş eriyor ve ince tuz gibi su çekmiyor, 3. günde sofra tuzu ile değiştirince etki çok iyi oldu, tavsiyem 1kg sofra tuzu kullanmanız.

IMG_2124

2. gün üzerine 3kg ağırlık koydum.

3.gün ağırlığın pek bir faydası olmadığını görerek sofra tuzuna geçtim,

5. günde et suyunu salıp 700gr kalmıştı. Bu aşamada yeterince sertleştiği (çok sert değil sadece sıkı) için sonraki aşamaya geçmeye karar verdim.

TUZUNU ALMA

Önce eti musluk altında iyice yıkıyoruz, tüm tu tanecikleri gidiyor, sonra büyükçe bir kap alıp içini su ile dolduruyor etimizi içine koyuyoruz. Etiniz kötü kokuyor diye korkup atmayın, 5 gün içindeki tüm kanı ve suyu vermiş olduğu için koku normal, yediğiniz hazır pastırmalar da bir zamanlar öyle kokuyordu 🙂
Bu aşama ne kadar tuzlu sevdiğinize ve kullanımınıza bağlı olarak değişiyor. Ben bulunduğum iklim şartlarına alışık olmadığım için sonraki aşamanın(kurutma) ne kadar süreceğini bilemedim bu yüzden bakteri oluşmasın diye eti sadece 2 sat suda bırakıp tuzunun çoğunun içinde kalmasını sağladım, bu yüzden biraz tuzlu bir pastırmam oldu, yemeklerde kullanmak için iyi ama doyasıya 8-10 dilim yemek için fazla tuzlu.  İklim kuru ise 1 gün bekletmenizi öneririm.

KURUTMA

Etimizin bir ucundan sağlam bir ip geçirip gölge bir yerde kurumaya bırakıyoruz. Güneşe koymak iyi değil, saçak altı gibi gölge ama açık hava bir yerde kurumasında fayda var, bu aşamada sineklere dikkat, genelde et tuzlu ve kuru olduğu için ilgilerini çekmiyor ama siz rahatsız oluyorsanız üstüne pamuklu bir kumaş geçirip içinde de kurumaya bırakabilirsiniz.

IMG_2193

Kuruma 2 gün kadar sürüyor ve sonuçta elimizde elimizi bastıramadığımız yumuşak tahta kıvamında kuru bir et kalıyor.
İşte etin kurumuş hali böyle birşey. Kurudukça tuz da yüzeye çıkıp beyaz beyaz görünüyor.

IMG_2227

ve geçiyoruz çemenlemeye.

ÇEMENLEME

Öncelikle çemeni hazırlamaya eti kurumaya astığınız gün başlamalısınız, 2 gün dolapta beklemiş çemen tam istediğimiz kıvama gelecek, yapıp aynı gün kullanırsanız aynı kaliteyi beklemeyin. Gelelim yapılışına.

ÇEMEN TARİFİ (1Kg et için)

  • 50 gram arpa unu (bulamazsanız normal un)
  • 12 gram mısır unu
  • 12 gram sarımsak püresi
  • 25 gram gram tatlı biber tozu(ing. Paprika)
  • 25 gram cemen tozu (ing. Fenugreek)
  • 1 tatlı kaşığı kimyon
  • 1 silme çay kaşığı karabiber
  • çeyrek çay bardağı sıvı yağ (kuruyunca kırılmasın dökülmesin diye)
  • kıvamlı bir macum haline getirecek kadar ılık su

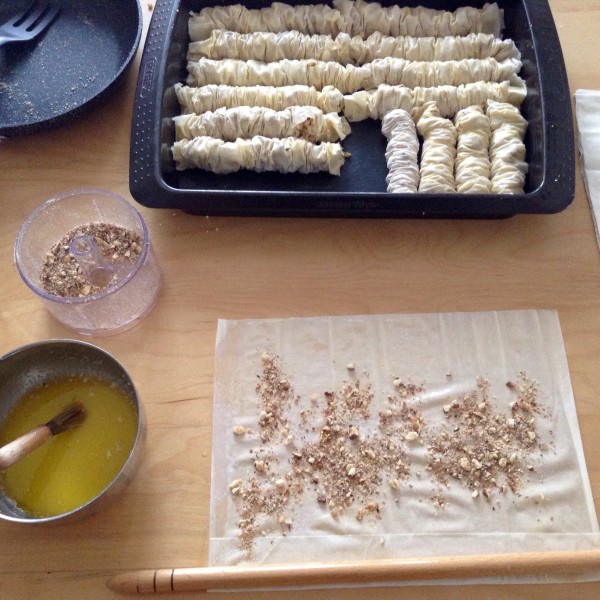
Malzemeleri karıştırıp dolaba koyun 2 gün bekletin. Yapışkan bir macun haline gelince kullanabilirsiniz.

Çemenimizi kurumuş etimizin her tarafına sürerek şu hale getiriyoruz. Burada dikkat edilecek birkaç nokta var. Öncelikle mutlaka ameliayt eldiveni kullanıyoruz, çünkü çemen oldukça ağır kokulu ve yapışkan bir madde, eti kaplarken de bol bol haşırneşir olmanız gerekeceğinden eldiveni takıp gönül rahatlığı ile dokunabilirsiniz. Eldivenli ellerimizi sık sık ıslatmak gerekiyor, Islak eldivene çemen yapışmıyor ve aşağıda gördüğünüz gibi pürüzsüz biçimde kaplamamıza imkan sağlıyor.

IMG_2229

Çemeni sürerken en büyük endişem fazla kalın olduğu idi, Etin etrafında neredeyse yarım parmak kalınlığında çemen olduğu için, bir türlü kurumayacağını düşünüyordum ancak yanılmışım.
Aksine çemen içindeki suyu verip kurudu ve sonunda 1-2mm kalınlıkta bir katman kaldı sadece.

Bu haldeki pastırmamı fazlaca güneşte kalmaktan sakınarak rüzgarlı kuru bir yerde kuruttum.
Aşağıdaki fotoğrafta dışarıda kururken görülüyor ancak bununu sadece ilk 1-2 saat dışı hızlı kurusun diye yaptım. Hava sıcaklığının yüksek olduğu yerlerde eti güneş altında fazla bırakırsanız yağları eriyerekdışında su geçirmez bir katman yapıyor ve kurumayı yavaşlatıyor, bu yüzden serin ve gölgede kurutmak veya güneş altında ise bile serin bir zamanda bunu yapmak gerekiyor.

Sonuç

İngilterenin yağışlı ve kapalı havasında 5-6 gün kadar kuruyup evi nefes alınamaz derecede çemen kokuttuktan sonra pastırmam hazır oldu. hazır olduğunu dışınaparmağınzıla bastırarak anlayabilirsiniz, parmağınız artık iz bırakmıyorsa tamamdır.
Son olarak pastırmamızı buzdolabına koyarak sıcaklığının 5-6 dereceye düşmesini sağlıyoruz. Oda sıcaklığında biraz yumşak gibi geliyorsa korkmayın dolaba girince sertleşecek.

Ve pastırma hazır, keskin ve büyük bir bıçak ile incecik dilimledikten sonra, İngiltere manzarası eşliğinde fotoğrafladım.
Tadı harika olmuş. Bu güne kadar Türkiyede hazır alıp yediğim pastırmaların çoğundan başarılı. Tek sorunu biraz tuzlu olması ki, Pastırmalı kurufasülye yaparken yemeğe biraz az tuz konursa dengeler.
Bu da adaya et ürünü sokmayanlara kapak olsun 🙂

IMG_2343

Önemli Not: Ben gıda uzmanı veya bu konularda deneyimli birisi değilim. Sadece insanın temel ihtiyaçlarını karşılayacak becerilere sahip olması gerektiğine inanan, bu yüzden Yoğurt, Peynir, Sabun, Sucuk, Pastırma gibi şeyler nasıl yapılır araştırıp öğrenen biriyim. Ben yapabiliyorsam siz de yapabilirsiniz. Afiyet olsun.

Treditional Italian Pizza Recipe

IMG_0247

Pizza Dough Integrents

  • 200ml warm water (35-40 Celcius)
  • 1 package (5gr) of active dry yeast
  • 500ml all-purpose flour
  • 4 Tbsp olive oil
  • 3 teaspoons salt
  • 2 teaspoon sugar

Pizza Integrents

  • Mozerella Cheese
  • Tomato
  • Tomato Paste (Puree)
  • Onion
  • Local cheeses or your favorites

Prepartion

Add the warm water in a large bowl. Sprinkle on the yeast and let sit for 5 minutes until the yeast is dissolved.

Add flour, salt and sugar and mix it well until the dough is smooth and elastic.

Cover the dough ball with olive oil,  cover the bowl with plastic wrap and put in a warm place for 1 hours. The dough will be twice time bigger in a hour because of yeast.

Punch the dough to deflate before use and make a circle or any flat shape, my personal suggestion; shapeless form is better than industrial circles.

Preheat your oven to 220 Degree Celcius,

IMG_0228

Put your favorite integrents  on your pizza and put in your oven for 10-15 minutes.
IMG_0238


IMG_0237

Bon a petite!

IMG_0247


IMG_0242


Home Made Chocolates

image

I’m making my own chocolates, because the mass produced chocolates including solid  vegetable oil, a lot of chemicals and poor taste.

I’m making different type of chocolates but strongly suggesting this recipe.

Materials

  • 200gr Milk Chocolate Couverture (mass)
  • 4 sweet spoon Tahini (Sesame seed paste)
  • 4 sweet spoon Honey
  • 2 sweet spoon Cinnamon
  • 1 tea spoon Vanillin (white powder)
  • 4 full table spoon crushed Hazelnut

Preperation

Melt Couverture chocolate in the microwave for 2 minutes or by the method of double boil,
Stir in a thin metal saucepan for 2-3 minutes on the cold marble kitchen table to reduce it’s temperature to 25 degree. This temperature is the best temperature for starting the 4th level quality chocolate crystals.(google “chocolate tempering” for more details)

Then add the other integrents  into the chocolate. It will be viscous but moldable material.
Put the mixture into the silicon molds. I’m using silicon ice cube molds, they are cheap and easy to clean.  wait in the refrigerator for 2 hours before removing mold. If it’s already sticky, put the molds into the freezer for hardening. After removing the mold, it must wait for a day in the refrigerator. Your chocolates will be harder after 24 hours.

Enjoy.


Glühwein Recipe

image

Hello everyone,

May be you know, I’m making my own vines since few years and we have a lot of vine at Home.

I’m not a drunk but I love to doing them. Glüewein is the best winter drink for me and my wife because of taste and low alcohol.

here is my receipt;

  • 2 liters Red Vine
  • 2 Oranges
  • One or Two cup sugar
  • 2 Cinamon stick
  • 6-8 Clove seeds

Preparation

Put all integrents into a big cylinder except half of orange. Keep it for decoration 😉
Heat it for a hours but avoid to boil. 80-85 degree Celsius will be perfect.

Bon a petite


Healthy Homemade Chocolate Cream

20131005-150031.jpg

Did your read the integrents of your favorite chocolate cream?
Just the fact that they all come out from the production of vegetable margarine and cheese whey that the plants killed if released into the environment . 5-8 % of cocoa (not the chocolate) . And also soy lecithin to combine water and the oil. It’s a nightmare .

Nutella is one of the most dreaded items on this subject , ” chocolate ” cocoa bean oil is an expensive ingredient, Nutella almost all made by the palm oil that the palm trees obtained by tightening of the body consisting of palm oil . So when you put in the closet, it will getting like stone . This is the reason of writing on  ” do not put in the closet ”

.

Anyway, I have a child and I don’t want to but these things. Than I read the history of real chocolate creams. Basically all creams made by chocolate, a vegetable oil to smoothing and sugar. I choose sesame seed paste (tahini) as oil and honey as sugar.

materials
200 grams Milk Chocolate Couverture ( mass) .
200 grams tahini .
2 tablespoons honey

preparation

Melt Couverture chocolate in the microwave for 2 minutes or by the method of double boil,
Stir for 2-3 minutes , add sesame oil and honey ,
Put in the closet for cooling and hardening .

for Cream with hazelnut

use hazelnut oil and crushed hazelnut as oil.

It’s healthy as possible and better taste.

Enjoy your meal. 🙂

.

20131005-145957.jpg

20131005-145927.jpg

Low Power Single Cell Li-PO/Li-ion Modifications for Raspberry Pi

Hi Everyone,

I have a Raspberry Pi web server(pi.melihkarakelle.com)(temporary unavailable) and I want to drive it with solar energy. The main problem is high current consumption of Raspberry Model B (330mA)

The solution is very simple. Just remove the Network/USB hub IC and solder two jumper wire(between R36 and R37) to enable one USB port without this IC.
Please read this blog first

After this hack, My Pi is working with 190mA at 5V including WiFi USB dongle . But this is not enough. The system working with 3.3v and on board linear voltage regulator dropping the 5v to 3.3v. This is compleately waste of energy. My second target is using better LDO regulator.

I replaced the original regulator with MIC2502-3.3
MIC2502 is very low drop out regulator IC and output is 3.3v when you supply it with 3.4v – 16v . If your supply drops to 3.1v, It will give already 3v output and still enough to working your Pi.

Here is the macro photo of the new regulator (you need fine soldering skill to doing that)

Now my Pi working with single cell Li-Po, Li-Ion  or USB without any extra modification.

You can save 20mA  by switching off the PAL/HDMI outputs. Add this command on your startup:

/opt/vc/bin/tvservice -off

then my web server working with only 170mA 🙂


Now my 5v 500mA solar panel will be enough to running my Pi and charging the single cell Li-Ion battery to the night.

I will share the other stages of the project on my new posts.


WS2812 RGB Addressable LED with Arduino

Hello Everyone,

This is the 20 minutes fun project of today.
WS2812 is the most interesting LED IC on the market. It is including an addressing IC and RGB LEDs in  5mmx5mm package.
The IC is accepting 24 bit (16 million) color codes.

You dont need any extra LED driver or addressing module except  an Arduino to drive it.
The magic part is the rock solid addressing penis enlargement secrets system. You can connect few hundred WS2811 on same line and control the each pixel separately with their own address.

This is the WS2812 LED strip control library for Arduino.
https://github.com/adafruit/Adafruit_NeoPixel

The sample code working flawlessly 🙂

If you want to make a color changing night light or something like that. This is your hero. Just connect and forget other driving problems.

Have an nice weekend
Melih

Making Mochi at Home

I like Mochi since my first visit to Asia.
It is Japanese rice cake that based on sushi rice.
The traditional method is using a wood hammer to making a jelly from steamed sushi rice. But you need a setup and huge man power to doing that.

The modern method very simple, just you need glutinous rice powder (Mochiko) and a microwave oven 😉

20130824-162726.jpg

Ingredients
mochiko : 1 cup
water : 1 cup
sugar (optional) 1/4 cup sugar.
potato or corn starch as needed

Directions

20130824-162755.jpg
Mix the integrents in a microwaveable bowl (the mochiko, water, and sugar) stir with a wooden spoon until smooth.
You can add cacao, food color or green tea powder to coloring and aroma. I used cacao in this time.

20130824-162825.jpg

Microwave the mixture for 5 minutes (at 800w) then well blend it with a spoon. And microwave again for another 4 minutes

20130824-162842.jpg

Coat your hands and table with starch so it doesn’t stick, then shape. (You can put red bean paste, nut paste or similar sweet pastes into you Mochi as core.
Be careful; it will be very hot.

Put your mochi balls in refrigerator for 1-2 hours then serve.

Boa petite 🙂

20130824-162902.jpg